6.7 KiB
| title | date | draft |
|---|---|---|
| Logo Design | 2024-01-27T20:13:10+01:00 | true |
I'm not that much into graphics design and this is not supposed to be a full tutorial on how to create a logo. However, I'd like to share my experiences with Inkscape and GIMP for creating the logo and favicon of this site.
Getting inspired
First of all I inspect other logo designs by searching for vector images using
the terms music and logo in the Pixabay community.
{{< icon "link" >}} URL: https://pixabay.com/vectors/search/music%20logo/
The idea of using notes appeals to me and as I also want to convey the spirit of
FLOSS I need to extend it by
something that represents its characteristics. I remember that in the logo of
the Gitea fork Forgejo the letter F is shown as a
forking path and want to combine it with notes.
Creating shapes
I run Inkscape and create a new document from template (<Ctrl><Alt><N>) and
choose Icon 512x512 in the Others tab. Using the rectangle and ellipse tool
I create the note head, stem and flag by scaling and rotation. Learn more about
shapes in the
official tutorial.
To indicate the fork at the top of second note's flag an ellipse without filling is used. For the purpose of recognizing the note head and fork symbol as unit I decide to also leave out the filling of the note head making it a half note. This decision is reflected in the colorization of the elements, too. The colors are selected in the fill and stroke dialog of the object menu explained in the basic tutorial. Finally, adjusting the z-order of the objects creates the layering.
Iterating on the idea
Some feedback and discussion in a music community chat makes me create just another iteration to realize that the symbol of a note may be misleading as it is typically associated with sheet music and notation programs. Thus, I start a new approach and play around with the Pen tool to create a music wave that forks into two different directions. The wave form is just a single path with some Bezier curve handles. This drawing technique and a lot of useful applications are described in the advanced Inkscape tutorial.
Before saving the document as SVG, useful
meta data can be added by opening the document settings (<Ctrl><Shift><D>) and
selecting the Meta data tab. Additionally, the License tab allows to
integrate URLs and the license deed and granted rights. Besides saving this file
for further editing, I use the export dialog (<Ctrl><Shift><E>) to create a
Plain SVG file leaving out Inkscape specific meta data which supports to
decrease the file size.
Serving diversity
The shapes of the logo are simple and recognizable. Thus, it can be perfectly used as favicon for the website. Though recent browsers and devices can render SVG files for this resource, it's good practice to serve other file types. Consequently, the last step is to convert (and if necessary scale) the SVG file to support older browsers and devices.
I open the SVG file in GIMP and confirm the dialog to render the Scalable Vector Graphics using default settings. Depending on the target file type and device I scale the image and convert it via the export dialog using the dimensions (in pixels) and file types shown in the table.
| Dimensions | File type | Additional info |
|---|---|---|
| 512 x 512 | PNG | |
| 192 x 192 | PNG | |
| 180 x 180 | PNG | Apple devices |
| 48 x 48 | ICO | 32 bpp, 8-bit alpha, no palette settings |
| 32 x 32 | PNG | |
| 16 x 16 | PNG |
You can also use Inkscape on the terminal to create these files:
inkscape --export-background-opacity=0.0 --export-width=512 --export-filename="android-chrome-512x512.png" logo.svg
inkscape --export-background-opacity=0.0 --export-width=192 --export-filename="android-chrome-192x192.png" logo.svg
inkscape --export-background-opacity=0.0 --export-width=180 --export-filename="apple-touch-icon.png" logo.svg
inkscape --export-background-opacity=0.0 --export-width=32 --export-filename="favicon-32x32.png" logo.svg
inkscape --export-background-opacity=0.0 --export-width=16 --export-filename="favicon-16x16.png" logo.svg
The file favicon.ico is created via Inkscape and the convert command of the
ImageMagick tool suite:
inkscape --export-background-opacity=0.0 --export-width=48 --export-filename="favicon-tmp.png" logo.svg
convert favicon-tmp.png favicon.ico
rm favicon-tmp.png
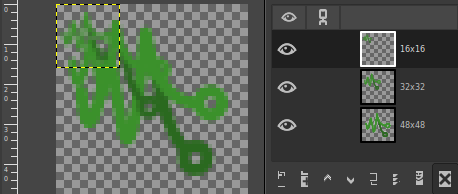
In addition to ICO file type
conversion best practice is to stack smaller size versions on top of the 48 x 48
pixels one. This can achieved by opening the favicon.ico in GIMP, copying and
scaling the original layer down to 32 x 32 and 16 x 16 pixels, and inserting it
as a new layer (<Ctrl><V>).
The new layer is inserted into the center of the image and has to be dragged to
the top left corner.
Adding a manifest
For a Progressive Web App
(PWA) create a manifest
file. At least provide the following values to serve different icon sizes and
change <your-name> to fit your needs:
{
  "name": "<your-name>",
  "start_url": "index.html",
  "display": "standalone",
  "icons": [
    {
      "src": "android-chrome-192x192.png",
      "sizes": "192x192",
      "type": "image/png"
    },
    {
      "src": "android-chrome-512x512.png",
      "sizes": "512x512",
      "type": "image/png"
    }
  ]
}
The icons array contains the images to be used when integrated as an app in the target OS. Learn more about the members in the manifest file and best practices for PWAs in the MDN Web Docs.
Resources
Repository: https://dri.ven.uber.space/thisven/Identity


